
3M Peltor ARC (Accessory Rail Connector) rail attachments are used for making ComTac VI headsets compatible with a helmet. Sometimes the headset needs to be converted between the ARC rail attachments and the headband.
Switching from the ARC attachments back to the headband may require some work. By following these steps below, your headset will be back to its original headband in minutes.
- Rotate the right earcup (the one with the boom microphone) and detach earcup arm guide. Reference figure 2.1a and 2.1b. Repeat for the other guide and now the helmet attachment will be removed. Now the earcup should look like figure 2.1c

- Detach the boom microphone connector from the connector jack on the left cup. (Figure 2.2a and 2.2b)

-
Rotate the left earcup and remove the boom microphone earcup arm guide shown in figure 2.3a and 2.3b.

Repeat step 3 for the other guide and the helmet attachment will be removed. Your headset should now look like figure 2.3C

- Rotate the boom microphone earcup arm guide and align it so it releases with ease from the helmet attachment pictured in 4a and 2.4b. Note: Make sure you rotate the boom microphone earcup arm guide as shown because of the earcup arm guide locks when positioned in place.

- Attach the boom microphone arm guide on the headband by rotating the arm guide and align it so it fits with ease (figure 2.5a and 2.5b). Note: Make sure you rotate the boom microphone earcup arm guide as shown because of the earcup arm guide lock when positioned in place.

- Install the headband with the boom microphone earcup arm guide on the left earcup. First, rotate the left cup to install the earcup arm guide as shown in figure 2.6a and 2.6b. Force is required. Note: The boom microphone earcup arm guide should be installed mirrored to the other earcup arm guides to avoid conflict with the boom microphone connector jack.

-
Rotate the boom microphone earcup arm guide in position and install the microphone connector to the earcup connector on the left earcup. (figure 2.7a and 2.7b)
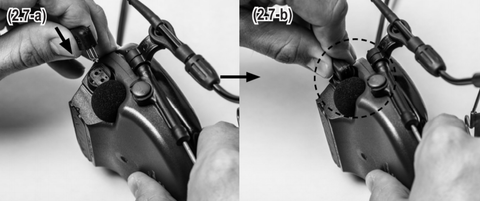 Repeat step 7 for the other guide and fully attach the left cup to the headband. Your headset should now look like figure 2.7c
- Attach the right earcup to the headband as shown in 8a and 2.8b. Force is required. Note: Push to pull the earcup arm guide on the earcup like in figure 2.6 or 2.8. If you have trouble attaching the use of a gripping tool is recommended.
 Repeat on the other side. Your earcups should now look like this (figure 2.8c and 2.8d)

- Adjust the headband cable on a loop that faces the back of the headset, referenced in figure 2.9a to prepare for headband assembly. Slide the open plastic band cover under the metallic band as shown in 9b, making sure the cable groove faces the front of the headset.

-
Run the headband cable in the rubber band groove and close the rubber band as shown in figure 2.10a by clicking the rubber band ridges shown in 10b.

-
Continue to clip all ridges. Ensure the cable is bedded in the plastic groove shown in 11b. Make sure all ridges are clipped, the cable is fully bedded in the groove, and cable loops are made on both sides of the headband to allow stress relief (as shown in 2.11c)


- Run the end of the cable loops from figure 2.11c in the two headband clips on each side of the headband, then clip them as appears in 12a and 2.12b figures.

- Pressing on the part of the headband featured in 13a, pull the wire loop of the headband from under the rubber piece, then run the rubber piece under the wire loop. (2.13b). This could require pushing force and caution to prevent any damage to the rubber jacket.
Repeat on both sides.
-
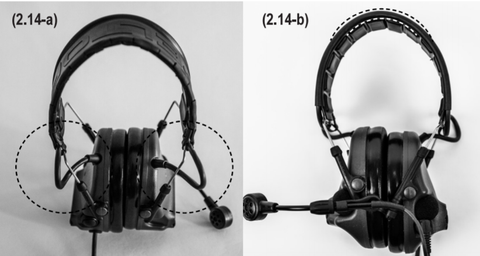
Your headset is now converted back to the headband. Take this time to inspect the headband to ensure it has been assembled properly. Headband cable should be looped in between the headband guides as appears in figure 2.14a. You should be able to read PELTOR when the headset is placed like in figure 2.14b.
If your headset does not look like what is pictured below, please retrace your steps and figure out what went wrong.
Please reference How to Attach ARC Rails to ComTac Headset article for detailed instructions on removing the headband guides. This may be necessary to correct the assembly of the headband.
For a downloadable version of the instructions, download here.
First Source Wireless is an industry leader in 3M Peltor headsets and accessories including popular ARC Rail Attachments and ComTac IV headsets. For more information or questions about a product, please contact us at 800-806-1076. Let us solve your communication needs.
Pictures Courtesy of 3M Corporation