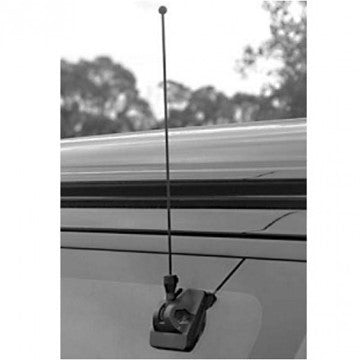
Installing a glass mount antenna is simple but there’s some tips and tricks to know before you start installation. Glass mounts use a heavy adhesive tape to attach to glass, mainly car windows. In this article, we’ll list some specifics you should know before you begin, and a step-by-step instruction guide on how to install one correctly.
Please read the entirety of these pre installation and step-by-step instructions BEFORE you begin installation.
Tips Before You Install (IMPORTANT)
Before installing your glass mount antenna, read through these tips to make sure your installation goes smoothly. Remember, once you mount an antenna you will have a hard time moving it.
- Do not install on front windshield, the glass is too thick.
- Avoid curved glass
- Don’t apply on heavy dark tinted windows or where tint film has been applied.
- Do not install over in-glass AM/FM dipole antenna
- Before installation, clean glass with water and mild detergent. Do not use ammonia-based glass cleaner.
- Make sure the glass is not cracked or shattered. If so, do not install this glass mount antenna.
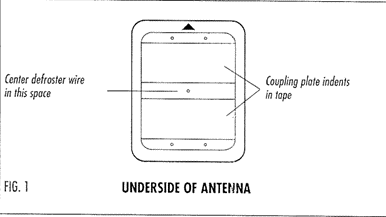
- To install on defroster wires, the wires must be spaced at least 1 inch or more apart. Place the antenna over the center of one wire, allowing it to pass between the horizonal plate (FIG. 1).
Steps to Install
- Be sure the vehicle glass is not too hot or too cold. For best installation, be sure to install on glass that is room temperature (70⁰ F/ 21⁰ C)
- Just a reminder, once you place your antenna, you’ll have a hard time moving it. Be sure this is the exact place you want your antenna and know how you’ll route the coax BEFORE you start. We recommend the upper portion of the of the window as it’s the best location for install. Make sure the antenna is clear from obstructions like wiper blades. Leave at least 1” to 1 ½” space between the antenna and glass frame.
- Clean the glass where you want to place your antenna with the provided alcohol cleaning pad and let dry naturally. Do this on both the inside and outside glass surface where the antenna will be placed. Wipe any access alcohol from your surface.
- On the outside mounting area, prepare the glass by cleaning with liquid adhesion enhancer (included). This will help clean the glass surface and give it the best adhesion to your antenna. Allow to completely dry before moving on.
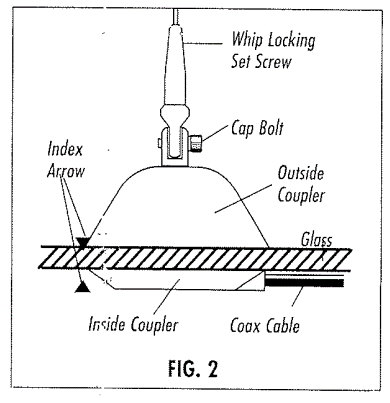
- Peal protective liner from the outside coupler. With the arrows pointing up, mount the outside coupler on the clean glass starting at the top and rolling down. Press firmly on all corners and in the center to ensure maximum contact.
- Look from the inside of the window, is the adhesive making contact with edges and corners? If not, apply additional pressure where needed.
Note: 100% contact is not always possible with curved glass.
- On the inside coupler, remove protective liner from adhesive tape. With the arrows pointing up mount the inside coupler opposite of outside coupler.
- Connect your
- Position swing arm and whip to the vertical position and tighten cap bolt at swing arm/coupler connection.
How to Remove
Removing a glass mount antenna is simple. To remove, take a flat putty knife and gently work the blade between the window glass and tape of both the inside and outside bases.
After both couplers have been removed, there will be some residue left over from the tape left on the mounting surface. Use lacquer thinner and a lint free cloth being careful to not damage foil contacts, to clean the surface.
Shop Glass Mount Antennas