A proper fitting Ops Core helmet not only gives you the best possible protection but makes it more comfortable to wear. Taking the time to adjust your helmet is important because not all head shapes and sizes are created equal. It’s recommended to adjust your helmet before its first use and each time after. All this information can be found in your FAST manual, but we’ve list it here too.
- Get the correct size
- Help get the best fit and protection
- Follow these directions for best functionality and performance.
- How to wear
- Adjust top pads
- Adjust rear pads
- Adjust fit band
- Preloading the fit band
- Tighten screws
- Install side pads
- Adjusting the Chinstrap
The right size
Ops core helmets come in 4 different sizes (M-XXL). Make sure your helmet matches closely to your head size. A helmet too small will sit too far above on your head while too large will move around and not sit securely on your head.
Refer to the helmet sizing guide below to confirm you are wearing a helmet made for your head size. To measure, use a measuring tape and measure around your head slightly above your eyebrows and ears. If you’re between two sizes, size up.
How to Wear Your FAST Helmet
Here is the right way to wear your FAST Helmet for the best functionality, protection, and performance.
-
Adjust top pads
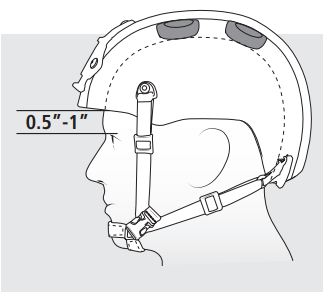
Place the helmet on your head. This helmet comes pre-installed with ½” pads. Turn the OCC dial and loosen the fit band and make sure the weight of the helmet is resting on top of your head. The forehead pads should be above and not resting on the ridge of your eyebrows.
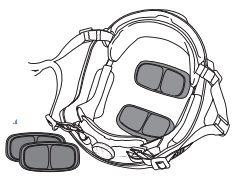
The distance on the bottom of the helmet to the top of your eyebrow should be 0.5” – 1”. Make sure there is enough room around your eyes for hearing protection headsets. If its too low, swap out the ½” top pads for the ¾” pads. If the helmet is still too uncomfortable, you can use a combination of the ½” and ¾” top pads until it’s the right fit.
-
Adjust the Rear Pads
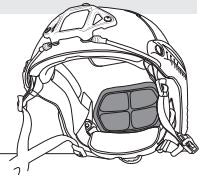
After installing the correct top pads, install the ¾” rear pads to the helmet and place the helmet on your head. If it’s too much pressure, take the ¾” pads out and swap with the ½” pads.
If it feels the same when you use the ½” pads, keep the ¾” pads installed.
-
Adjust the fit band
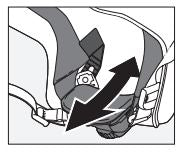
Ops core helmets come with an OCC dial to adjust the fit of your helmet. Put the helmet on your head and turn the OCC dial to tighten the fit band until secure. Look up to the sky, if the dial touches the back of your neck, it’s too low.
Adjust the height of the OCC dial by sliding the fit band liner tabs inside the shell up and down.
-
Preload the fit band
Set the shape of your fit band to match the shape of your head. Push or pull the rear fit band liner tabs to adjust the tension of the fit band from a round shape to more oval shape.
Hold the rear fit band liner tabs in your hand and when you found the optimal shape, tighten the back screws to lock it in place.
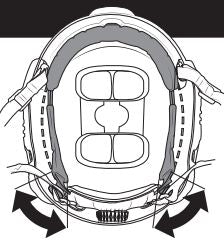
-
Tighten the back screws
Tighten the back screws to lock the rear fit band liner tabs, chinstrap, and side rails in place. If you don’t do this, all your adjustments that were just made will come undone.
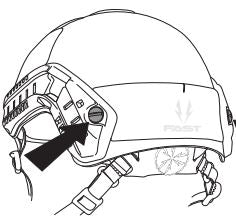
-
Install the side pads
Install the side pads on the inside of your helmet. These pads make the helmet more stable and help offer more protect from side impacts. If its too tight, move them around until you find the optimal fit.
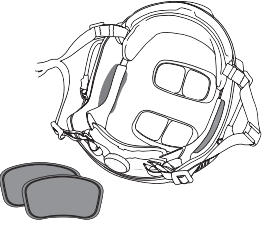
Adjusting the Chinstrap
-
Put the helmet on and fasten the chinstrap buckle. Turn the OCC dial knob to tighten the fit band until snug.
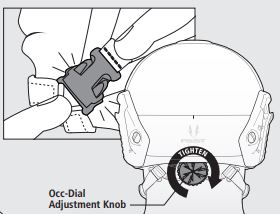
-
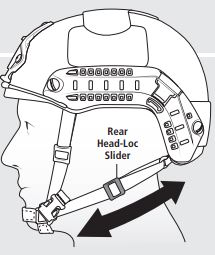
Using both hands, pull the two rear head lock plastic sliders (found resting on your jaw) towards your chin until snug.
-
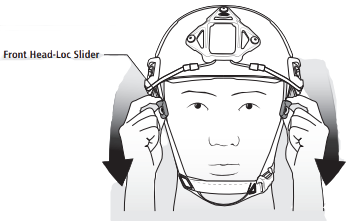
Using both hands, pull the front head lock plastic sliders (found resting on your temple), towards your chin until snug.
*All pictures in this posts are courtesy of Gentex Ops Core. We do not own the right to these images.

